My Business Calendar - Privacy Note
This app does not enable access to and use of Internet-based or mobile services, or collects and/or transmits user information to me or a third party.
Sunday, November 17, 2013


Thursday, April 4, 2013
My Business Calendar - SharePoint 2013 App
Introduction:
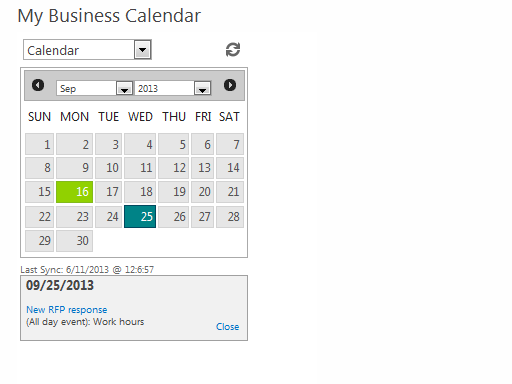
This SharePoint 2013 App is developed as an App Part to display events added in a SharePoint Calendar list in a compact calendar control. User can add this App Part on his/her home page. This App Part automatically connects to all available calendar lists in your site and allows you to switch between calendars on-the-fly.
Description:
This SharePoint App is developed using client side code, REST API and JQuery DatePicker control.
Feature Highlights -
• This app is developed as an App Part and can be added on any SharePoint site.
• A compact calendar widget will highlights the dates of all events of the current month present in the Calendar list of the site. Different color code is used for different event types.
• This app automatically connects to any calendar present in your site and allows you to switch on the go.
• The dates when hovered displays associated event as tool tip.
• Events snippet is displayed below calendar, when clicked would open event's page.
My Business Calendar - Privacy Notice
This app does not enable access to and use of Internet-based or mobile services, or collects and/or transmits user information to me or a third party.
This SharePoint 2013 App is developed as an App Part to display events added in a SharePoint Calendar list in a compact calendar control. User can add this App Part on his/her home page. This App Part automatically connects to all available calendar lists in your site and allows you to switch between calendars on-the-fly.
Description:
This SharePoint App is developed using client side code, REST API and JQuery DatePicker control.
Feature Highlights -
• This app is developed as an App Part and can be added on any SharePoint site.
• A compact calendar widget will highlights the dates of all events of the current month present in the Calendar list of the site. Different color code is used for different event types.
• This app automatically connects to any calendar present in your site and allows you to switch on the go.
• The dates when hovered displays associated event as tool tip.
• Events snippet is displayed below calendar, when clicked would open event's page.
My Business Calendar - Privacy Notice
This app does not enable access to and use of Internet-based or mobile services, or collects and/or transmits user information to me or a third party.
Wednesday, January 2, 2013
BS WP Blog Reader at MS App Store
BS WordPress Blog
Reader App is published into Microsoft App Store and available at -
Pls feel free to add
it in your site and provide me your feedback so that I can try and incorporate
your suggestions in subsequent release.
I identified
some enhancements to this App -
- Blog Subscription - A SP List for holding blog URLs. User can manage list for Add/Update/Delete Blog URL. All URL added in subscription list will be available in the UI (drop-down list).
- Freshly Pressed WordPress Blogs - A new page for displaying all newly pressed WP Blogs. User will get a subscribe option/button. Once user click on subscribe button, URL of the blog will be automatically added in to subscription list.
- Help - A new page for providing help administering and using BS WordPress Blog Reader App
- Preview - A new page for preview of BS WordPress Blog Reader App.
At present I'm
working on these enhancements(hoping to complete in
a weeks time.)
Tuesday, December 4, 2012
SharePoint 2013 App - BS Word Press Reader App
BS Word Press Blog
Reader App is simple yet powerful App which enable you to connect any WordPress
blog. You just need to provide the blog URL and click 'Get', bingo..
This App displays
'Blog Title', 'Blog Excerpt' and images associated with the blog (at present
max 5 images are displayed).
This App uses JSON
call for fetching data from Word Press so display is pretty fast almost real
time.
This App is a Client
Web Part which can be added to any SharePoint page with a Web Part Zone. When
you add this App this will by default connect to my Word Press Site (WoodClix).
You can type any blog address in the URL space and connect to any blog.
Imp -
Blog URL Format: woodclix.wordpress.com (provide URL in this
format)
(Another example - en.blog.wordpress.com)
Limitation -
Currently Word Press
REST API only support 5 images.
As of now App will
fetch only 20 blog post


Friday, August 26, 2011
Taxonomy
What is taxonomy?
A taxonomy is a set of concepts organized into a hierarchical structure covering a topical domain. You could think of it as a structured vocabulary. For example, in biology, a commonly used taxonomy is that to describe all plants and animals.
Generally, the categories are arranged in parent-child structure that takes the focus from broadest to most narrow. Again, to use the example of biology, the Plant and Animal taxonomy starts out at the highest level of Kingdom, and continues down through Phylum, Class, Order, Family, Genus until finally reaching the lowest level of Species. Each category may have its own set of synonyms to account for different ways of expressing the same concept.
What are taxonomies used for?
A taxonomy can help make a large body of knowledge more understandable by providing an organization for the knowledge.
Taxonomies make it easier to interact with a large amount of information. If your business needs to make information more findable, then you may want to consider taxonomy. This could range from a website with a business database search, an e-commerce website, or internal company documents.
What benefits does having a SharePoint Site Taxonomy provide?

1. How long does the site need to exist (is it permanent, short-term, or long-term)?
2. What kind of and how much content is expected for the site?
3. Who should have access to the site?
4. Who will be able to create and edit content for the site?
5. What is the purpose of the site?
The answers to these (and other questions) can help IT staff classify the site. The taxonomy can be
applied to a standard set of properties within the organization such as:
provisioning and, eventually, allowing for it to be automated.The taxonomy provides much more than a common set of terms, it provides a foundation upon which future decisions are made. It provides a scalable hierarchy that allows a SharePoint deployment to grow in an organized, predictable, and understandable manner.
A taxonomy is a set of concepts organized into a hierarchical structure covering a topical domain. You could think of it as a structured vocabulary. For example, in biology, a commonly used taxonomy is that to describe all plants and animals.
Generally, the categories are arranged in parent-child structure that takes the focus from broadest to most narrow. Again, to use the example of biology, the Plant and Animal taxonomy starts out at the highest level of Kingdom, and continues down through Phylum, Class, Order, Family, Genus until finally reaching the lowest level of Species. Each category may have its own set of synonyms to account for different ways of expressing the same concept.
What are taxonomies used for?
A taxonomy can help make a large body of knowledge more understandable by providing an organization for the knowledge.
Taxonomies make it easier to interact with a large amount of information. If your business needs to make information more findable, then you may want to consider taxonomy. This could range from a website with a business database search, an e-commerce website, or internal company documents.
What benefits does having a SharePoint Site Taxonomy provide?
From the end user perspective, it gives us a starting point for information architecture and - more specifically - navigation. Consider the following SharePoint Site taxonomy:

Using the site taxonomy above, it becomes much easier to imagine a navigation system for a corporate
intranet.From an IT perspective, the taxonomy drives much more than how sites and navigation are presented to the end user. The taxonomy provides a consistent framework for making decisions about sites and how they should be provisioned and governed. Rather than treating every site as a custom entity, asking questions that allow for the classification of a site can enable IT staff to easily make decisions regarding the configuration of that site. Some pertinent questions might include:
2. What kind of and how much content is expected for the site?
3. Who should have access to the site?
4. Who will be able to create and edit content for the site?
5. What is the purpose of the site?
The answers to these (and other questions) can help IT staff classify the site. The taxonomy can be
applied to a standard set of properties within the organization such as:
- Disk space quota
- Default look and feel
- URL Path
- Backup schedule
- SLA
- Content Types
provisioning and, eventually, allowing for it to be automated.The taxonomy provides much more than a common set of terms, it provides a foundation upon which future decisions are made. It provides a scalable hierarchy that allows a SharePoint deployment to grow in an organized, predictable, and understandable manner.
Wednesday, July 7, 2010
Audit Capability at Document Level
I was looking for a tool with below capabilities:
1.) Granular audit capabilities (Document level)
2.) Generate Audit usage reports
3.) Who viewed what?
and found Syntergy Auditing tool is good tool and it has all the above capabilities. I would love to know if there are any better tools available in the market.
1.) Granular audit capabilities (Document level)
2.) Generate Audit usage reports
3.) Who viewed what?
and found Syntergy Auditing tool is good tool and it has all the above capabilities. I would love to know if there are any better tools available in the market.
Sunday, June 14, 2009
SharePoint Favorites : CaptureLinksV1.1
Guys, finally I'm ready with my CaptureLinksV1.1. For those who are newcomer to this post, I'll say this CaptureLinks - SharePoint utility is really doing good.And in just 15 days I have a good managed database of my Internet Favorites & that also managed in the SharePoint List.
So now as promissed I have done some significant changes in my current release like 'Setting' option and categorization of Internet Favorites (using different SharePoint List at run time). You can get your new version of CaptureLinks at below Url:
Download: CaptureLinksV1.1 Happy SharePointing Cheers!!!
So now as promissed I have done some significant changes in my current release like 'Setting' option and categorization of Internet Favorites (using different SharePoint List at run time). You can get your new version of CaptureLinks at below Url:
Monday, June 1, 2009
Capture Links 1.0: Portable Internet Favorites
Capture Links 1.0: Portable Internet Favorites |
|
I have been travelling across the globe since last four years; every time I move from one location to another I was able to carry all my data except my internet favorite links which are more important to me than the huge backup.
I have been playing with SharePoint quite a while so I thought I can develop something in SharePoint to fulfill my purpose and this purpose seems to become easy by using the SharePoint Links List.
As I was developing "Capture Links" I found, other than storing my links at central location this tool turned out to be fulfilling many other purposes also like:
- My Internet Favorite Links are no more tied up with one machine.
- I can share my links with my friends, colleges and team mates. So I need not to send them URLs on e-mail and messenger window.
- All my links are searchable from SharePoint search engine. So I can easily get hold of them.
- My Internet Favorite is very good for me but that contains only those topics which I like most. Using "Capture Links" we can create a collaborative List where all members can add their useful links too and without any extra effort we can create a knowledge base.
- We can use SharePoint alerts to keep track of our knowledgebase list.
How it Works: From Internet Explorer select a line of text which is relevant to the page description, now right-click and select "Capture Link" from the Internet Explorer context menu.

(Your 90% work is done at this point). This will launch the Capture Links Application filled with all selected data:

Now enter the URL of your site and Click Connect button. This will populate all the links list present in that particular site, select any Links List and click Save.

Here you go; your link has been added successfully. Check in your SharePoint Links List you will find a new entry as you have added right now.

Monday, May 4, 2009
Dashboards in MOSS using VisiFire Charts:
Dashboards: An upcoming face of MOSS Business Intelligence |
When we think about some jazzy dashboards for any Business Management Solution or Project Management site, Silverlight turns out to be a maximum hit area. I also entered in this magic world after the quest of some jazzy dashboard solution, and found 'VisiFire' is the name of this arena. VisiFire is an open source self contained charting solution built with Silverlight. If you haven't seen VisiFire before, it's worth checking out, their gallery page shows a number of really slick animated charts that are dead simple to use with XML data (without writing any Silverlight code).
I'm not going to do any great thing here as you may get couple of example to walk you through for implementation point of view. So, why I'm writing this blog? Good question!! Well the answer is I'll be taking a scenario where we can twist the XML of these graph as per our need. So it will make more desirable and with this tweak you can show any information in the form of super jazzy Silverlight charts. Let's kick off
- We will use the out of the box Task List, created in the SharePoint Site.
(Make sure you have some data in this Task List.) - Create a page in SharePoint that will hold a Data View Web Part. You can use SharePoint Designer for this, with a Web Part Zone selected, from the top menu click Data View > Insert Data View. From the Data Source Library in the right hand task pane select your list and click Show Data. Then select both the Title and Status fields and add them to the Data View. After adding the Data View Web Part just make sure you do not have selected any paging option. Select display all items.

- Unzip the VisiFire package that you downloaded and grab "Visifire2.js" and "SL.Visifire.Charts.xap" and add them to the same location as the page you just created in your SharePoint site. (In my example I have uploaded them in my Shared Document Library )
- Now here it comes where we will be doing the actual stuff. It's now time to Modify the XSLT.
I always use visual studio for this. (See here for an important note about intellisense that will help you a lot).
I create an empty project add two new files (replacing the words "Original" and "New" as appropriate):

- Original.xslt
- New.xslt
- In Original.xslt, Search and replace the first xsl:template:
<xsl:template
match="/"><xsl:call-template
name="dvt_1"/></xsl:template>
With this XSLT:
<xsl:template
match="/"
xmlns:x="http://www.w3.org/2001/XMLSchema"
xmlns:d="http://schemas.microsoft.com/sharepoint/dsp"
xmlns:asp="http://schemas.microsoft.com/ASPNET/20"
xmlns:__designer="http://schemas.microsoft.com/WebParts/v2/DataView/designer"
xmlns:SharePoint="Microsoft.SharePoint.WebControls">
<!-- Load the chart tools -->
<script
type="text/javascript"
src="Visifire2.js"></script>
<!-- Create the JavaScript variable that holds the data to plot. -->
<!-- Note the xsl:for-each statement which loops over all the -->
<!-- list items and creates the necessary DataPoint entries -->
<!-- in the Chart XML. -->
<xsl:text
disable-output-escaping="yes"><![CDATA[
<script type="text/javascript">
var xmlString =
' <vc:Chart xmlns:vc="clr-namespace:Visifire.Charts;assembly=SLVisifire.Charts"'
+ ' Width="350" Height="300" Theme="Theme2" View3D="True" BorderBrush="Gray" BorderThickness="0" Watermark="False" >'
+ ' <vc:Chart.Titles><vc:Title Text="Task Status"/></vc:Chart.Titles>'
+ ' <vc:Chart.Series>'
+ ' <vc:DataSeries RenderAs="Pie" LabelLineThickness="0.5" ShowInLegend="True" Bevel="False">'
+ ' <vc:DataSeries.DataPoints>'
]]></xsl:text>
<!—Here we will query the Status field -->
<!—and display the consolidated Status values in Pie Chart. -->
<xsl:text
disable-output-escaping="yes">
<![CDATA[ + ' <vc:DataPoint AxisXLabel="Completed]]></xsl:text>
<xsl:text
disable-output-escaping="yes"><![CDATA[" YValue="]]></xsl:text>
<xsl:value-of
select="count(/dsQueryResponse/Rows/Row[normalize-space(@Status) = 'Completed'])"/>
<xsl:text
disable-output-escaping="yes"><![CDATA[" LabelText="Completed]]></xsl:text>
<xsl:text
disable-output-escaping="yes"><![CDATA[" Exploded="False]]></xsl:text>
<xsl:text
disable-output-escaping="yes"><![CDATA["/>']]></xsl:text>
<xsl:text
disable-output-escaping="yes">
<![CDATA[ + ' <vc:DataPoint AxisXLabel="Not Started]]></xsl:text>
<xsl:text
disable-output-escaping="yes"><![CDATA[" YValue="]]></xsl:text>
<xsl:value-of
select="count(/dsQueryResponse/Rows/Row[normalize-space(@Status) = 'Not Started'])"/>
<xsl:text
disable-output-escaping="yes"><![CDATA[" LabelText="Not Started]]></xsl:text>
<xsl:text
disable-output-escaping="yes"><![CDATA[" Exploded="False]]></xsl:text>
<xsl:text
disable-output-escaping="yes"><![CDATA["/>']]></xsl:text>
<xsl:text
disable-output-escaping="yes">
<![CDATA[ + ' <vc:DataPoint AxisXLabel="In Progress]]></xsl:text>
<xsl:text
disable-output-escaping="yes"><![CDATA[" YValue="]]></xsl:text>
<xsl:value-of
select="count(/dsQueryResponse/Rows/Row[normalize-space(@Status) = 'In Progress'])"/>
<xsl:text
disable-output-escaping="yes"><![CDATA[" LabelText="In Progress]]></xsl:text>
<xsl:text
disable-output-escaping="yes"><![CDATA[" Exploded="False]]></xsl:text>
<xsl:text
disable-output-escaping="yes"><![CDATA["/>']]></xsl:text>
<xsl:text
disable-output-escaping="yes">
<![CDATA[ + ' <vc:DataPoint AxisXLabel="Waiting on someone else]]></xsl:text>
<xsl:text
disable-output-escaping="yes"><![CDATA[" YValue="]]></xsl:text>
<xsl:value-of
select="count(/dsQueryResponse/Rows/Row[normalize-space(@Status) = 'Waiting on someone else'])"/>
<xsl:text
disable-output-escaping="yes"><![CDATA[" LabelText="Waiting others]]></xsl:text>
<xsl:text
disable-output-escaping="yes"><![CDATA[" Exploded="False]]></xsl:text>
<xsl:text
disable-output-escaping="yes"><![CDATA["/>']]></xsl:text>
<xsl:text
disable-output-escaping="yes">
<![CDATA[
+ ' </vc:DataSeries.DataPoints>'
+ ' </vc:DataSeries>'
+ ' </vc:Chart.Series>'
+ ' </vc:Chart>';
</script>
]]></xsl:text>
<!-- Create the div to hold the chart and then run -->
<!-- the JavaScript code to actually show the chart. -->
<div
id="TaskPieChart">
<script
language="javascript"
type="text/javascript">
var pTaskChart = new Visifire2("SL.Visifire.Charts.xap",350,300);
pTaskChart.setDataXml(xmlString);
pTaskChart.render("TaskPieChart");
</script>
</div>
</xsl:template>
- Save the file and refresh the page in a browser and you should see a pie chart come to life animated. If you make any mistakes the VisiFire widget is kind enough to give you a line number and position where it blew up, so that can be a help in tracking down typos in the notoriously picky XSLT.

From here you can check out the other charts and other options via the VisiFire documentation which btw is really easy to read.

Concluding Thoughts:
I love this graphing concept, but I hate the fact that I have to go in and do so much hand-coding. I've given a little thought to whether it can be generalized and I'm optimistic, but I'm also a little fearful that there may be a brick wall somewhere along the path that won't offer any work-around. If anyone has some good ideas on this, please make a note in the comments or email me.
Field Name Gotcha's:
There are at least two things to look out for with your field names.
First, a field name with a space has to be escaped in the XSL. This will probably be an issue here:
        <xsl:variable name="totalCompleted"
            select="count(/dsQueryResponse/Rows/Row[normalize-space(@Status) = 'Completed'])" />
If your "Status" column is actually named "Status Code" then you need to reference it as "Status_x0020_Code":
Second, and I'm a little fuzzy on this, but you also need to be on the alert for field name changes. If you name your field "Status Code" and then later on, rename it to "AFE Status", the "internal name" does not change. The internal name will still be "Status Code" and must be referenced as "Status_x0020_Code".
Thursday, April 9, 2009
SharePoint (MOSS 2007) Analysis with Google Analytics
SharePoint (MOSS 2007) Analysis with Google Analytics |
GA is a web analytics package provided free by Google. I heard about this tool some time ago but never got any chance to use it. The very moment I heard of this tool, I got some illuminance as I can use it for SharePoint Site analysis.
We can apply GA to only one page OR whole site (master page). I'll explain both the ways one by one:
Applying GA to SharePoint Site Master Page:
Follow the Steps mentioned below:
- Obtain the Fully Qualified Domain Name (FQDN) for your MOSS site.
For example, given a local hostname myhost and a parent domain name example.com, the fully qualified domain name is myhost.example.com.
- Create your Google Analytics account (see detail below). FYI, you don't need to pass any authentication in order to track hits to your site.
When you set up your new account, you need to enter your FQDN in the URL field, and you need to enter it the way they specify:

- Add the GA tracking code to your site's master page within the HTML tags, which will allow you to analyze all the sub-pages, not just the home page.
Finding your personalized Google Analytics Tracking Code
The tracking code is profile-specific, which is why you can only access it via the Profile Settings page for a specific profile. Below is an example of what the code snippet will look like. The symbols "xxxxxx-x" in the sample below is Google Analytics account number. You can find it in your personalized Google Analytics Tracking Code.
Note: Google has created separate scripts for secure and non-secure URL. So while adding the Web Site URL in Step-2, you can select "http" OR "https". It will give you the appropriate script.


Point to be pondered:
I just want you to go back to Step-1, where I mentioned abut FQDN. But to work with MOSS what really needs to be entered for the Website URL is the full URL with the /pages/default.aspx ending. For example; if your domain is www.mydomain.com you would enter www.mydomain.com/pages/default.aspx. This is because Google won't like the fact that it's getting redirected to /pages/default.aspx and will bail if you don't provide that part. For setting this full URL you have two options:
Option 1:
- From the home page of your Google Analytics account, click Edit:

- Click Edit at the upper right in the Profile Settings window:
- At this point you can change your website URL. For the example I'm using, you would enter:
<FQDN>/pages/default.aspx.
For Example: http://mydomain.com/default.aspx

Option 2:
Option 2 is not much different from Option 1. Here in Option 2 you can keep your Website URL as FQDN and in addition you can specify the Default Page (i.e. default.aspx) also.

Note: After completing all the steps below, please be little patient as it will take 24 hours for Google to display your report.
Applying GA to SharePoint Page:
Applying Google Analytics to only one page includes all the steps for setup of Google analytics account. Other than that we need to perform some actions which I'm mentioning below:
- Add a Content editor Web Part to our SharePoint Site Page.
- Click on 'Modify Shared Web Part'.
- Click on the 'Source Editor'


Paste the Java Script provided by GA in this Source Editor. Click Save and then Click OK.
Thursday, April 2, 2009
Site Directory in SharePoint Site
Introduction: |
When you create a site collection in SharePoint based on the OOTB starter template "Collaboration Portal Template" you get a series of sub sites such as "Document Center", "News", "Reports", "Search" and "Sites". The site called "Sites" is created by default and it comes wired with a site directory. Typically if your organization has just installed SharePoint or are evaluating SharePoint this "Collaboration Portal Template" is the first place an end user will start their interaction with SharePoint.
The out-of-box site directory includes three tabs: Categories, Top Sites,
and Site Map.
Categories and Top Sites rely upon information stored in the Sites list while the Site Map is automatically rendered.
The Categories Tab
The default categories that appear in the site directory are Division, Region,
and Tasks and Tools. These are column names in the Sites custom list (Sites > View All Site Content > Sites > Settings > List Settings). The sub-categories (e.g. beneath Region there is Local, National, and International) are column values for the column. In the case of Region, Region is a choice column in the Sites custom list and Local, National, and International are available values for that column.
The Sites custom list has several views.
Categories:
This view defines what is shown on the Categories.aspx page. For example, if you open the Categories view (Sites > View All Site Content > Sites > Settings > List Settings > Views > Categories) you will see that the three columns that are checked are Division, Region, and Tasks and Tools. These represent the categories that are visible on the Categories.aspx page.
- Site Creation Categories:
This view defines what categories appear when a new site is created.
Listing Sites in Site Directory
When you create a new site and indicate that you want it to be listed in the site directory, and you specify which categories you want it listed under, a new list item is created in the Sites custom list. For example, if you click Site Actions > Create Site and you create a site called Test Site 1, listing it under all possible site categories, then a new list item is created in the Sites custom list.
The Division and Region values you specified when you created the site appear as properties data for that list item. Since you selected all of the possible Division and Region values when you created Test Site 1, you can test the way the site directory works by clicking on one of these categories in the site directory.
You can add previously created sites to the site directory by creating new list items in the Sites custom list.
Specifying a Different Site Directory
If you delete the default Site Directory site and create a new one you will notice that the site creation options for listing new sites in a site directory are no longer available. In order to associate site creation to a Site Directory other than the default one, you need to specify this new Site Directory.
Navigate to Home > Site Actions > Site Settings > Modify All Site Settings > Site Collection Administration > Site Directory Settings. Here you can define the location of the Site Directory. You can also enforce site creation options from this screen.
Master Site Directory
To ensure that any site and site collection being created within your SharePoint farm is listed in your "Site Directory" you need to add/configure the URL of your "Site Directory" in Central Administration. Go to Central Administration and to the Operations Tab. Under "Global Configuration" click on "Master site directory settings".
Once the URL of your master site directory has been set you can enforce the listing of new site collections in the Site Directory and ensure that you capture the correct Categorization meta data for your sites. This setting effectively provides the Global location for your Master Site Directory. You may think that this is all it's required to list all the sites in the Site Directory but you also need to configure this at your site collection level in your deployment.
Site Directory Links Scan
Another most often overlooked functional part of maintaining the Site Directory is hidden away in Central Administration. This is called "Site Directory Links Scan"
Effectively you can check for broken site links and get a report as well as update your site description listings in the Site Directory using Site Directory Links Scan. Site Directory Links Scan is available via the Operations tab in Central Administration.
The site property update is automated to reflect any changes you may apply to how the sites are categorized and listed in the Sites list in your Site Directory.
Once you have enabled Site Directory Links Scan you can also go to your SharePoint Site and from your Site Directory site select Site Settings and "Scan for Broken Links" which will initiate a manual scan. This will search the "Sites" list located in the Site Directory site for any changed or broken links.
The scanner will provide you with options of what View you would like to scan and update you of the Scan progress.

|
|
MOSS with ATLAS (ASP.Net AJAX)
Introduction - MOSS with ASP.Net AJAX: |
ASP.NET AJAX is the newest addition to ASP.NET 2.0 and is a supported Microsoft framework for next-generation Web development using AJAX technologies. AJAX is shorthand for "Asynchronous JavaScript + XML," an approach to Web applications that utilizes asynchronous data requests from the page with a client-side JavaScript engine. It is not one technology, but rather a combination of technologies that enables rich-client responsiveness in the browser when used together. It's also not a new technology, but rather a new trend that combines old technologies in a new way. The technologies include object-oriented JavaScript, asynchronous data requests utilizing the XMLHttpRequest object, XML data streams, Extensible Style sheet Language transformation (XSLT) transforms, and dynamic manipulation of the HTML Document Object Model (DOM). It more closely resembles a recipe for Web applications than a single architecture-it is an approach to Web applications based on rendering and manipulating data in smaller components during the page's life cycle in response to user actions on the client rather than the processing of the entire page as a whole. Because of this design pattern, Web Parts make an excellent deployment mechanism for AJAX components in Microsoft Windows SharePoint Services (WSS), and many of the built-in WSS APIs can be leveraged in JavaScript code from the browser.
The main benefit of using AJAX techniques in Web applications is an increased level of responsiveness once possible only in rich-client applications. Instead of waiting for a page reload or form post to update the user interface, the browser can send a discrete call to the server by using the XmlHttpRequest object while enabling the user to continue working.
Windows SharePoint Services version 3 builds much more directly on top of ASP.NET 2.0; therefore, many of the capabilities of ASP.NET AJAX work directly with SharePoint.
In a few cases there are some compatibility issues between ASP.NET AJAX and SharePoint (anticipated to be addressed in the first service pack of Windows SharePoint Services). Specifically, there are some limitations on usages of the UpdatePanel in web parts and controls. I personally experienced this issue in TreeView control inside the Update Panel.
Adding ASP.NET AJAX to SharePoint Pages : |
- Download and install ASP.NET AJAX on servers in your farm.
- Extend web.config with some settings to enable ASP.NET AJAX technology.
- Add the ASP.NET AJAX Script Manager into your master page to enable scenarios such as Extenders or UpdatePanels. (Install the full "ASP.NET 2.0 AJAX Extensions 1.0" from ajax.asp.net. )
The AJAX WSS Web page life cycle: |
The figure below (Figure – 1.0) illustrates the dynamic nature of the AJAX approach. Instead of one fat data stream being processed in the main request/response, individual components are responsible for their processing and can be individually refreshed and updated in response to user actions, events, or timer components.

(Figure – 1.0)
The user interface and data streams could also evolve over the client life cycle of the page-new components can be spawned from additional data sources and loaded into new components, all without reloading or posting the Web page. The Web page life cycle is much longer in an AJAX application because the page is not refreshed after the initial page load.
AJAX Web Parts: |
AJAX components within Web Parts require the Web Part Client Control Registration Pattern. With this design pattern, a placeholder is registered with the page and processed through a convention in the JavaScript application load event.
The other most important thing is Extending SharePoint web.config files with ASP.NET AJAX. It requires some Ajax registration entries in-line with WSS registration entries.
Sample Code: |
using System;
using System.Text;
using System.Web.UI;
using System.Web.UI.WebControls;
using System.Web.UI.WebControls.WebParts;
using Microsoft.SharePoint;
using Microsoft.SharePoint.Utilities;
using Microsoft.SharePoint.WebControls;
using Microsoft.SharePoint.Administration;
using System.Reflection;
using System.Data;
namespace AJAXWebPart
{
public class AJAXWebPart:WebPart
{
System.Text.StringBuilder html = new System.Text.StringBuilder();
SPTreeView sptv; // SharePoint display TreeView
TreeView tv; // Dummy Tree view asp.net control
string strSPWebApplication = "";
private DataTable _table;
protected override void CreateChildControls()
{
base.CreateChildControls();
this.EnsureUpdatePanelFixups();
UpdatePanel up = new UpdatePanel();
up.ID = "UpdatePanel1";
up.ChildrenAsTriggers = true;
up.UpdateMode = UpdatePanelUpdateMode.Conditional;
this.Controls.Add(up);
tv = new TreeView();
sptv = new SPTreeView();
GetSiteCollection(); //Function to Fill all Site Collection Only..
sptv.CollapseAll();
sptv.TreeNodeExpanded += new TreeNodeEventHandler(sptv_TreeNodeExpanded);
sptv.TreeNodeCollapsed += new TreeNodeEventHandler(sptv_TreeNodeCollapsed);
up.ContentTemplateContainer.Controls.Add(tv);
up.ContentTemplateContainer.Controls.Add(sptv);
}
void sptv_TreeNodeCollapsed(object sender, TreeNodeEventArgs e)
{
TreeNode CurNode = new TreeNode();
CurNode = e.Node;
CurNode.CollapseAll();
}
void sptv_TreeNodeExpanded(object sender, TreeNodeEventArgs e)
{
TreeNode CurNode = new TreeNode();
string strWebNode = e.Node.Text;
CurNode = e.Node;
CurNode.ChildNodes.Clear();
CreateTreeOnExpandNode(strWebNode, CurNode);
}
public void CreateTreeOnExpandNode(string URL,TreeNode nodeExpanded)
{
SPSite site = new SPSite(URL);
SPWeb web = site.RootWeb;
//rootnode = new TreeNode(web.Url);
foreach (SPWeb web1 in web.Webs)
{
TreeNode childnode = new TreeNode(web1.Url);
GetChild(web1, childnode);
nodeExpanded.ChildNodes.Add(childnode);
}
}
private void GetChild(SPWeb web1, TreeNode refnode)
{
foreach (SPWeb web2 in web1.Webs)
{
TreeNode subsitenode = new TreeNode(web2.Url);
refnode.ChildNodes.Add(subsitenode);
GetChild(web2, subsitenode);
}
}
public void GetSiteCollection()
{
SPWebApplication wa;
wa = SPControl.GetContextWebApplication(Context);//Get Url from HTTP context
SPSiteCollection wasites = wa.Sites;
TreeNode rootnode;
sptv.RootNodeStyle.ImageUrl = "/_layouts/1033/IMAGES/USM.gif";
foreach (SPSite site in wasites)
{
SPWeb web = site.RootWeb;
rootnode = new TreeNode(web.Url);
if (web.Webs.Count > 0)
{
TreeNode emptyNode = new TreeNode();
rootnode.Collapse();
rootnode.ChildNodes.Add(emptyNode);
}
sptv.Nodes.Add(rootnode);
}
}
private void EnsureUpdatePanelFixups()
{
if (this.Page.Form != null)
{
string formOnSubmitAtt = this.Page.Form.Attributes["onsubmit"];
if (formOnSubmitAtt == "return _spFormOnSubmitWrapper();")
{
this.Page.Form.Attributes["onsubmit"] = "_spFormOnSubmitWrapper();";
}
}
ScriptManager.RegisterStartupScript(this, typeof(AJAXWebPart), "UpdatePanelFixup", "_spOriginalFormAction = document.forms[0].action; _spSuppressFormOnSubmitWrapper=true;", true);
}
}
}
Subscribe to:
Posts (Atom)